How I Integrated Zapier into my Django Project
2022-04-18

As you might know, I have been developing, providing, and supporting the prioritization tool 1st things 1st. One of the essential features to implement was exporting calculated priorities to other productivity tools. Usually, building an export from one app to another takes 1-2 weeks for me. But this time, I decided to go a better route and use Zapier to export priorities to almost all possible apps in a similar amount of time. Whaaat!?? In this article, I will tell you how.
What is Zapier and how it works?
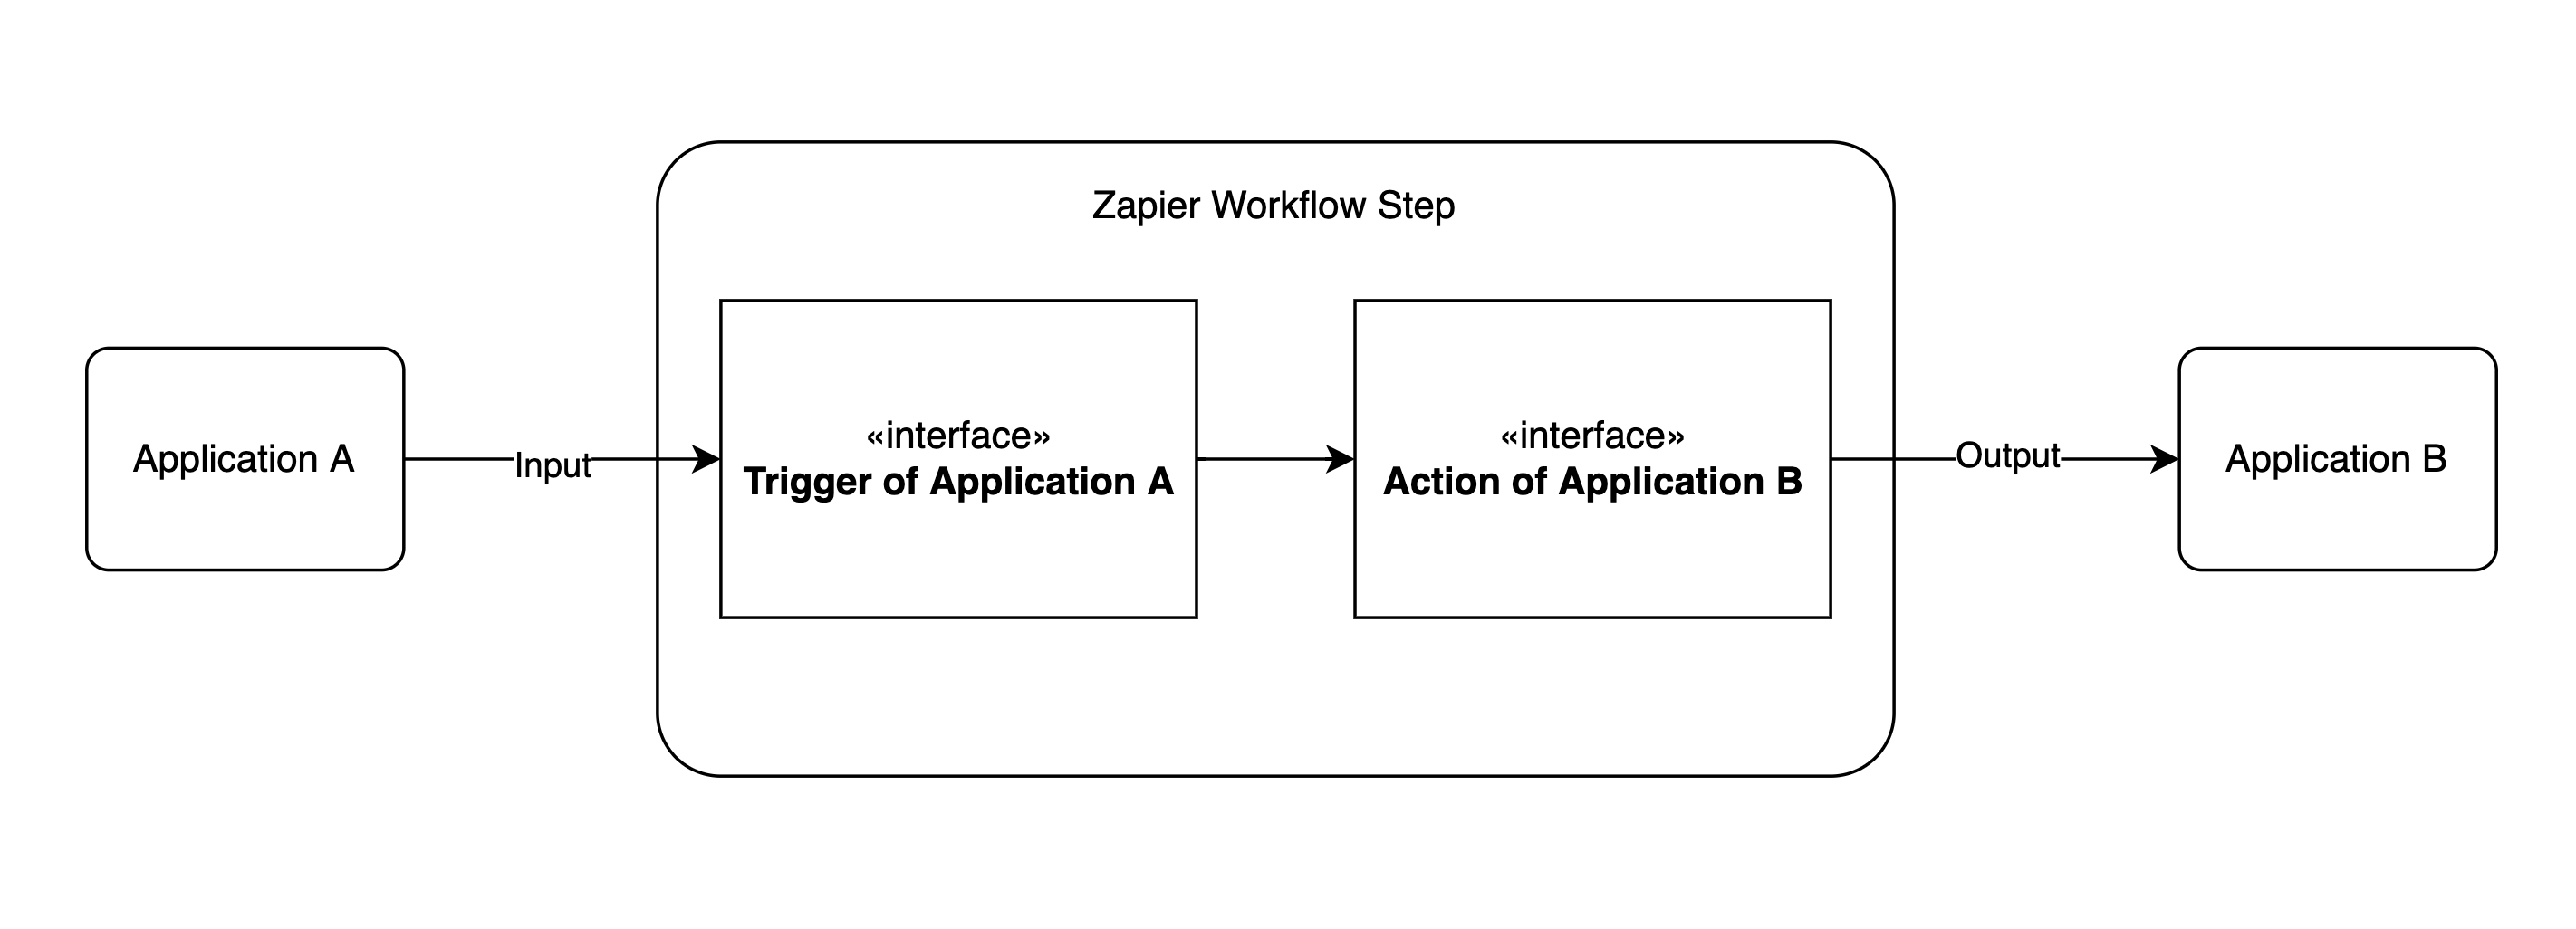
The no-code tool Zapier takes input from a wide variety of web apps and outputs it to many other apps. Optionally you can filter the input based on conditions. Or format the input differently (for example, convert HTML to Markdown). In addition, you can stack the output actions one after the other. Usually, people use 2-3 steps for their automation, but there are power users who create 50-step workflows.

The input is managed by Zapier's triggers. The output is controlled by Zapier's actions. These can be configured at the website UI or using a command-line tool. I used the UI as this was my first integration. Trigger events accept a JSON feed of objects with unique IDs. Each new item there is treated as a new input item. With a free tier, the triggers are checked every 15 minutes. Multiple triggers are handled in parallel, and the sorting order of execution is not guaranteed. As it is crucial to have the sorting order correct for 1st things 1st priorities, people from Zapier support suggested providing each priority with a 1-minute interval to make sure the priorities get listed in the target app sequentially.
The most challenging part of Zapier integration was setting up OAuth 2.0 provider. Even though I used a third-party Django app django-oauth-toolkit for that. Zapier accepts other authentication options too, but this one is the least demanding for the end-users.
Authentication
OAuth 2.0 allows users of one application to use specific data of another application while keeping private information private. You might have used the OAuth 2.0 client directly or via a wrapper for connecting to Twitter apps. For Zapier, one has to set OAuth 2.0 provider.
The official tutorial for setting up OAuth 2.0 provider with django-oauth-toolkit is a good start. However, one problem with it is that by default, any registered user can create OAuth 2.0 applications at your Django website, where in reality, you need just one global application.
First of all, I wanted to allow OAuth 2.0 application creation only for superusers.
For that, I created a new Django app oauth2_provider_adjustments with modified views and URLs to use instead of the ones from django-oauth-toolkit.
The views related to OAuth 2.0 app creation extended this SuperUserOnlyMixin instead of LoginRequiredMixin:
from django.contrib.auth.mixins import AccessMixin

class SuperUserOnlyMixin(AccessMixin):
    def dispatch(self, request, *args, **kwargs):
        if not request.user.is_superuser:
            return self.handle_no_permission()
        return super().dispatch(request, *args, **kwargs)
Then I replaced the default oauth2_provider URLs:
urlpatterns = [
    # …
    path("o/", include("oauth2_provider.urls", namespace="oauth2_provider")),
]
with my custom ones:
urlpatterns = [
    # …
    path("o/", include("oauth2_provider_adjustments.urls", namespace="oauth2_provider")),
]
I set the new OAuth 2.0 application by going to /o/applications/register/ and filling in this info:
Name: Zapier
Client type: Confidential
Authorization grant type: Authorization code
Redirect uris: https://zapier.com/dashboard/auth/oauth/return/1stThings1stCLIAPI/ (copied from Zapier)
Algorithm: No OIDC support
If you have some expertise in the setup choices and see any flaws, let me know.
Zapier requires creating a test view that will return anything to check if there are no errors authenticating a user with OAuth 2.0. So I made a simple JSON view like this:
from django.http.response import JsonResponse


def user_info(request, *args, **kwargs):
    if not request.user.is_authenticated:
        return JsonResponse(
            {
                "error": "User not authenticated",
            },
            status=200,
        )
    return JsonResponse(
        {
            "first_name": request.user.first_name,
            "last_name": request.user.last_name,
        },
        status=200,
    )
Also, I had to have login and registration views for those cases when the user's session was not present.
Lastly, at Zapier, I had to set these values for OAuth 2.0:
Client ID: The Client ID from registered app
Client Secret: The Client Secret from registered app
Authorization URL: https://apps.1st-things-1st.com/o/authorize/
Scope: read write
Access Token Request: https://apps.1st-things-1st.com/o/token/
Refresh Token Request: https://apps.1st-things-1st.com/o/token/
I want to automatically refresh on unauthorized error:
Checked
Test: https://apps.1st-things-1st.com/user-info/
Connection Label: {{first_name}} {{last_name}}
Trigger implementation
There are two types of triggers in Zapier:
- (A) Ones for providing new things to other apps, for example, sending priorities from 1st things 1st to other productivity apps.
- (B) Ones for listing things in drop boxes at the former triggers, for example, letting Zapier users choose the 1st things 1st project from which to import priorities.
The feeds for triggers should (ideally) be paginated. But without meta information for the item count, page number, following page URL, etc., you would usually have with django-rest-framework or other REST frameworks. Provide only an array of objects with unique IDs for each page. The only field name that matters is "id" – others can be anything. Here is an example:
[
    {
        "id": "39T7NsgQarYf",
        "project": "5xPrQbPZNvJv",
        "title": "01. Custom landing pages for several project types (83%)",
        "plain_title": "Custom landing pages for several project types",
        "description": "",
        "score": 83,
        "priority": 1,
        "category": "Choose"
    },
    {
        "id": "4wBSgq3spS49",
        "project": "5xPrQbPZNvJv",
        "title": "02. Zapier integration (79%)",
        "plain_title": "Zapier integration",
        "description": "",
        "score": 79,
        "priority": 2,
        "category": "Choose"
    },
    {
        "id": "6WvwwB7QAnVS",
        "project": "5xPrQbPZNvJv",
        "title": "03. Electron.js desktop app for several project types (42%)",
        "plain_title": "Electron.js desktop app for several project types",
        "description": "",
        "score": 41,
        "priority": 3,
        "category": "Consider"
    }
]
The feeds should list items in reverse order for the (A) type of triggers: the newest things go at the beginning. The pagination is only used to cut the number of items: the second and further pages of the paginated list are ignored by Zapier.
In my specific case of priorities, the order matters, and no items should be lost in the void. So I listed the priorities sequentially (not newest first) and set the number of items per page unrealistically high so that you basically get all the things on the first page of the feed.
The feeds for the triggers of (B) type are normally paginated from the first page until the page returns empty results. The order should be alphabetical, chronological, or by sorting order field, whatever makes sense. There you need just two fields, the ID and the title of the item (but more fields are allowed too), for example:
[
    {
        "id": "5xPrQbPZNvJv",
        "title": "1st things 1st",
        "owner": "Aidas Bendoraitis"
    },
    {
        "id": "VEXGzThxL6Sr",
        "title": "Make Impact",
        "owner": "Aidas Bendoraitis"
    },
    {
        "id": "WoqQbuhdUHGF",
        "title": "DjangoTricks website",
        "owner": "Aidas Bendoraitis"
    },
]
I used django-rest-framework to implement the API because of the batteries included, such as browsable API, permissions, serialization, pagination, etc.
For the specific Zapier requirements, I had to write a custom pagination class, SimplePagination, to use with my API lists. It did two things: omitted the meta section and showed an empty list instead of a 404 error for pages that didn't have any results:
from django.core.paginator import InvalidPage

from rest_framework.pagination import PageNumberPagination
from rest_framework.response import Response


class SimplePagination(PageNumberPagination):
    page_size = 20

    def get_paginated_response(self, data):
        return Response(data)  # <-- Simple pagination without meta

    def get_paginated_response_schema(self, schema):
        return schema  # <-- Simple pagination without meta

    def paginate_queryset(self, queryset, request, view=None):
        """
        Paginate a queryset if required, either returning a
        page object, or `None` if pagination is not configured for this view.
        """
        page_size = self.get_page_size(request)
        if not page_size:
            return None

        paginator = self.django_paginator_class(queryset, page_size)
        page_number = self.get_page_number(request, paginator)

        try:
            self.page = paginator.page(page_number)
        except InvalidPage as exc:
            msg = self.invalid_page_message.format(
                page_number=page_number, message=str(exc)
            )
            return []  # <-- If no items found, don't raise NotFound error

        if paginator.num_pages > 1 and self.template is not None:
            # The browsable API should display pagination controls.
            self.display_page_controls = True

        self.request = request
        return list(self.page)
To preserve the order of items, I had to make the priorities appear one by one at 1-minute intervals. I did that by having a Boolean field exported_to_zapier at the priorities. The API showed priorities only if that field was set to True, which wasn't the case by default. Then, background tasks were scheduled 1 minute after each other, triggered by a button click at 1st things 1st, which set the exported_to_zapier to True for each next priority. I was using huey, but the same can be achieved with Celery, cron jobs, or other background task manager:
# zapier_api/tasks.py
from django.conf import settings
from django.utils.translation import gettext
from huey.contrib.djhuey import db_task


@db_task()
def export_next_initiative_to_zapier(project_id):
    from evaluations.models import Initiative

    next_initiatives = Initiative.objects.filter(
        project__pk=project_id,
        exported_to_zapier=False,
    ).order_by("-total_weight", "order")
    count = next_initiatives.count()
    if count > 0:
        next_initiative = next_initiatives.first()
        next_initiative.exported_to_zapier = True
        next_initiative.save(update_fields=["exported_to_zapier"])

        if count > 1:
            result = export_next_initiative_to_zapier.schedule(
                kwargs={"project_id": project_id},
                delay=settings.ZAPIER_EXPORT_DELAY,
            )
            result(blocking=False)
One gotcha: Zapier starts pagination from 0, whereas django-rest-framework starts pagination from 1. To make them work together, I had to modify the API request (written in JavaScript) at Zapier trigger configuration:
const options = {
  url: 'https://apps.1st-things-1st.com/api/v1/projects/',
  method: 'GET',
  headers: {
    'Accept': 'application/json',
    'Authorization': `Bearer ${bundle.authData.access_token}`
  },
  params: {
    'page': bundle.meta.page + 1  // <-- The custom line for pagination
  }
}

return z.request(options)
  .then((response) => {
    response.throwForStatus();
    const results = response.json;

    // You can do any parsing you need for results here before returning them

    return results;
  });
Final Words
For the v1 of Zapier integration, I didn't need any Zapier actions, so they are yet something to explore, experiment with, and learn about. But the Zapier triggers seem already pretty helpful and a big win compared to individual exports without this tool.
If you want to try the result, do this:
- Create an account and a project at 1st things 1st
- Prioritize something
- Head to Zapier integrations and connect your prioritization project to a project of your favorite to-do list or project management app
- Then click on "Export via Zapier" at 1st things 1st.
Cover photo by Anna Nekrashevich
Django Advanced No Code Zapier Import Django REST Framework Export API
Also by me
Django Paddle Subscriptions app
For Django-based SaaS projects.
Django GDPR Cookie Consent app
For Django websites that use cookies.

